Ubuntu 8.10 正式版要等到 10 月 30 日才發布,實在是等不及就先下載 beta 測試版來體驗看看有什麼改變,不過安裝完就迎面遇上螢幕解析度的問題…
在 VirtualBox 2.0.2 中安裝完後,螢幕解析度最大只能調整到 800 x 600,字型實在太大桌面空間很小,網頁都超出桌面範圍了
之前試玩 Ubuntu 8.04 在 VirtualBox 中安裝完"客端額外功能(VBoxGuestAdditions)"就能正確偵測支援的螢幕解析度,可是在 8.10 中就是不行最高還是只有 800 x 600,也許要等新版 VirtualBox 修正此問題。
2008/10/24更新:
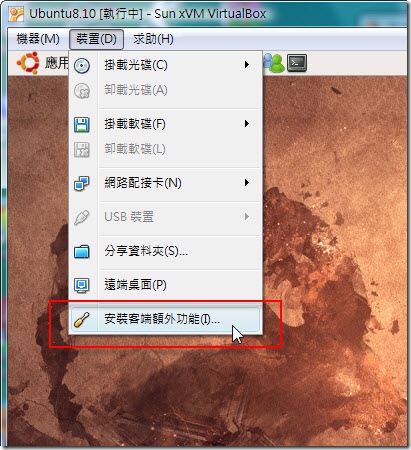
今天釋出的新版本 VirtualBox 2.0.4 已經修正此問題囉!重新安裝【客端額外功能】就可以了,安裝方法可參考「安裝 VirtualBox 的客端額外功能」
安裝完【客端額外功能】後重開機,按下鍵盤【右邊的 Ctrl】 + 【F】就可以全螢幕,再按一次就恢復到視窗模式
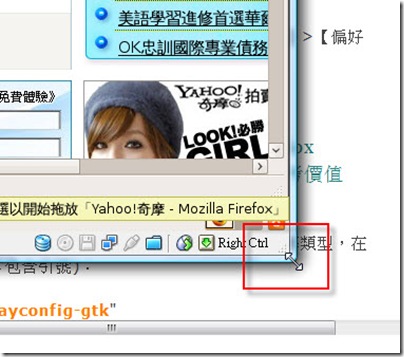
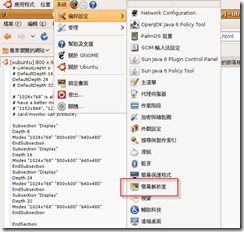
甚至不需要到【系統】>【偏好設定】> 【螢幕解析度】調整解析度,滑鼠停留在視窗角落,即可任意調整螢幕解析度,放開滑鼠左鍵後,Ubuntu桌面會自動適應視窗大小
接下來的方法只適用於Ubuntu 8.10+VirtualBox 2.0.2!
上網找到了解決方法,叫出 Gnome 螢幕設定來修改螢幕類型,在終端機中下達(不包含引號):
"gksudo displayconfig-gtk"
奇怪!輸入後在 8.10 中就是沒反應!
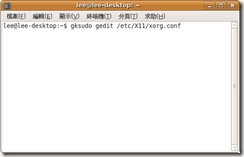
當然我沒有這樣就放棄了,在這邊找到了方法,在終端機中輸入以下命令(不包含引號):
"gksudo gedit /etc/X11/xorg.conf"
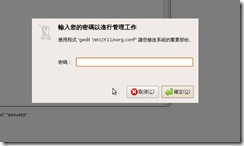
輸入 root 密碼
刪除 xorg.conf 中的全部內容,複製以下內容貼上取代原本,存檔後重開機
Section "Device"
Identifier "VESA Framebuffer"
Driver "vesa"
#VideoRam 4096
# Insert Clocks lines here if appropriate
EndSectionSection "Monitor"
Identifier "My Monitor"
HorizSync 31.5 – 150.0
VertRefresh 75-85
EndSectionSection "Screen"
Identifier "Screen 1"
Device "VESA Framebuffer"
Monitor "My Monitor"# If your card can handle it, a higher default color depth (like 24 or 32)
# is highly recommended.# DefaultDepth 8
# DefaultDepth 16
DefaultDepth 24
# DefaultDepth 32# "1024×768" is also a conservative usable default resolution. If you
# have a better monitor, feel free to try resolutions such as
# "1152×864", "1280×1024", "1600×1200", and "1800×1400" (or whatever your
# card/monitor can produce)Subsection "Display"
Depth 8
Modes "1024×768" "800×600" "640×480"
EndSubsection
Subsection "Display"
Depth 16
Modes "1024×768" "800×600" "640×480"
EndSubsection
Subsection "Display"
Depth 24
Modes "1024×768" "800×600" "640×480"
EndSubsection
Subsection "Display"
Depth 32
Modes "1024×768" "800×600" "640×480"
EndSubsectionEndSection
Section "ServerLayout"
# The Identifier line must be present
Identifier "Simple Layout"# Each Screen line specifies a Screen section name, and optionally
# the relative position of other screens. The four names after
# primary screen name are the screens to the top, bottom, left and right
# of the primary screen. In this example, screen 2 is located to the
# right of screen 1.Screen "Screen 1"
EndSection
回到【系統】>【偏好設定】> 【螢幕解析度】中
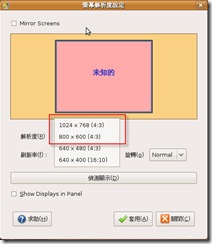
解析度的選單中就出現 1024 x 768 的選項可以使用,選擇好按下【套用】就行了。
PS:在 VirtualBox 中是無法啟動 Compiz Fusion的桌面特效唷!想體驗絢麗的3D效果,但又不想移動 Windows 檔案,建議使用 Wubi 安裝 Ubuntu


非常感謝你的分享 ><!!
小妹正好遇到這個問題 謝謝你!